Wednesday, February 6, 2013

HEARTS!!!

Biggest to Smallest Hearts!!

Here is our morning paper.

For our activity we cut a 12x18 piece of construction paper into thirds.  Then we wrote on the bottom, one side said "Biggest to...." the other said "Smallest" 

  
We also cut out a series of hearts in different sizes and colors.  


This is a really simple craft for the kids and teaches a really important concept.  

Here is what their work mat looked like.


They were asked to write their names on the paper and then turn it over when done.  


After


We started by explaining how to figure out which one is bigger than the other,  this is called comparing and contrasting, they learned how to hold one next to the other to compare it to the size of the other.

Then they laid them out on their paper BEFORE they glued them to make sure they had each size correct.  


After they thought they got them in the correct order they then were able to glue them on.  


That is all there is simple and easy, but a much needed concept to learn.  


Hearts and the Color Red

This weeks theme is two things that go together, The color Red and Hearts. Since we are fast approaching Valentines Day our activities for the coming week are going to have a lot to do with that.  


Here is our morning paper, they had to color the things that would normally be Red.

Our activity is a simple Heart book, that will work a lot on Cutting skills, following directions and fine motor skills with coloring.  Here is our supplies.


They are going to cut on the big black line in the center, once done cutting we will staple the book together for them.


Not sure why,but I don't have any other pictures of the craft, BUT if you look at the pictures you will see that they have to color a specific page a certain color.  When they are done they get to show how well they can read the book they made.  

Sorry I promise to get more pictures next time.


Hearty Groundhog

Groundhog's Day


Well the Superbowl put me behind in blogging so I am going have to catch you up on what we have been doing at Preschool the last few days. 

Today was the day before Groundhog's Day and since it is also the first day of February we decided to do the Hearty Groundhog.  When finished he should look like the below picture.


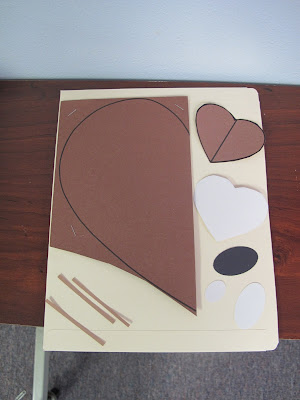
For Prep you will need the following: Brown paper with half a heart traced on it, A smaller Brown Heart with a line down the middle, A smaller White heart, 2 White Ovals, 1 Black Oval and 6 small thin rectangles.  


To start you give your preschoolers the big Brown half a heart, (we stapled it together so it wouldn't open before we wanted it to).  Then explain to them how to properly hold the scissors and also where you want them to cut and let them cut away.  When they are done have them write their names on one side.


After you show them what they cut out (a heart) have them lay it on the table upside down with the pointy side up.


Still with their name facing them give them the smaller Brown heart with the line down the middle and have them cut it in half.  They then glue it on the top part of the heart, (can you see my two little x's that is where they were to put their half a heart)

I missed getting a picture of it, but still with the name facing out glue the small White heart to the bottom of the upside down heart. 

Then have then hide their name, now the work begins on the front of our Groundhog. 


Glue the two White Oval's on the front and the one Black one for the nose.


Have them color in a smaller Black oval in the middle of the two White ovals for the eyes.


Then finally glue the 6 thin rectangle's around the nose for whiskers. 


And there you have it a Groundhog made out of Heart's how fun is that?


And a lot of artistic interpretation too!